Python如何使用Django
做本科毕业设计的时候,使用Python+Django的组合构建了一个基于BS模式的文物知识图谱平台,但是遇到了一些问题没有及时整理,到了搭建研究生毕业设计的展示系统的时候重走了一些老路。
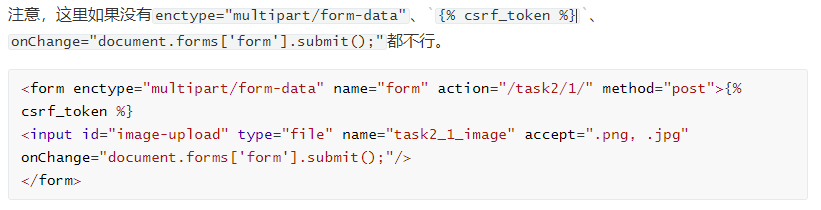
如何在HTML网页上上传文件
我的展示系统想要实现文件上传功能,实际上想通过文件上传得到图像的名字,然后对后台对应的图像进行计算,返回计算得到的各个步骤的结果和最终的结果。
所以我这里的做法比较简单:
view.py
这里只得到文件名即可
def run_task2_1(request):
    f = request.FILES['task2_1_image']
    image_name=f.name
    ...
urls.py
在url解析中添加这一句:
re_path(r't ask2/1/', view.run_task2_1),
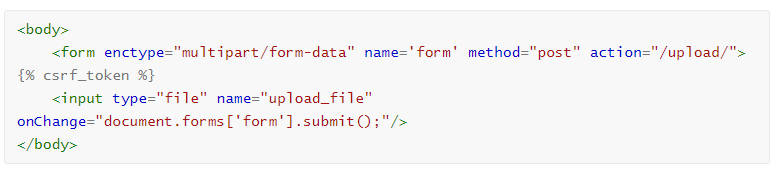
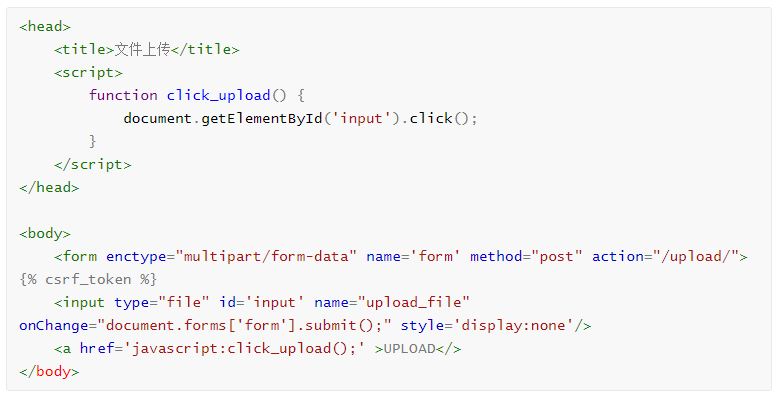
HTML模板
主要参考链接:https://www.jianshu.com/p/4e6773f59067
view.py
views中两个处理逻辑:file_upload函数负责提供上传页面(此函数正式平台不需要,后面讲到);upload负责接收文件并完成实际的文件处理,返回生成的报告。
def file_upload(request):
    return render(request, 'file_upload_input_submit.html')

def upload(request):
    f = request.FILES['upload_file']
    filename = f.name
    with open('upload\\{}'.format(filename), 'wb+') as destination:
        for chunk in f.chunks():
            destination.write(chunk)

    # do something with the file uploaded
    report = '<h1>UPLOADED FILE:{}</h1><h2>REPORT FROM FILE CONTENTS</h2>'.format(filename)

    # render report
    return render_to_response('report.html', {'report': report})
url.py
添加两个地址路由:file_upload地址路由到views.file_upload,upload地址路由到views.upload。
from django.contrib import admin
from django.urls import path
import app.views as views

urlpatterns = [
    path('admin/', admin.site.urls),
    path('file_upload/', views.file_upload),
    path('upload/', views.upload),
]
HTML模板
隐藏input按钮
如何显示本地图片
想要使用Django的项目显示本地图片,关键在于配置url,不能直接返回图像的实际在本机上的地址。
urls.py
urls.py中需要单独解析图像的url,然后通过正则表达式解析和配置document_root,将图像映射到本地的文件上。
from django.conf.urls import url
from django.contrib import admin
from django.urls import path, re_path
from django.views.static import serve

from website import view

urlpatterns = [
    path('admin/', admin.site.urls),

    # 解析图像
    url(r'task2/1/input_image/(?P<path>.*)$', serve, {'document_root': 'C:/Users/xxxx/Documents/Pycharm Projects/BikePersonImageProcessing/BikePerson-700/BikePerson-700-origin/query'}),
    # 解析其他域名
    re_path(r'task1/', view.run_task1),
    re_path(r'task2/1/', view.run_task2_1),
    re_path(r'task2/2/', view.run_task2_2),
    re_path(r'task2/3/', view.run_task2_3),
    path('', view.homepage),
]
view.py
在view中,需要将图片加一个解析的标志,例如我这里加了一个input_image_url = "input_image/" + image_name,从而可以让其与urls.py中的URL解析对应起来。
def run_task2_1(request):
    f = request.FILES['task2_1_image']
    image_name=f.name

    # input_image_path
    input_image_url = "input_image/" + image_name
    html_replace['input_image_path'] = input_image_url
    input_image_folder_path = os.path.join(DATASET_PATH, 'BikePerson-700-origin/query')
    input_image_width, input_image_height = image_resize(image_name, input_image_folder_path)
    html_replace['input_image_height'] = input_image_height
    html_replace['input_image_width'] = input_image_width

    image_src = os.path.join(input_image_folder_path, image_name)
    image_dst = os.path.join(DATASET_PATH, "BikePerson-700-demo/query", image_name)
    shutil.copyfile(image_src, image_dst)

    # 运行人体分割程序
    return_message = os.popen("cd \"" + BPIP_PATH + "\" && conda activate bpp && python superpixel_segment.py")
    print("[BikePersonImageProcessing]\n" + return_message.read())

    # superpixel_image_path
    superpixel_image_url = "superpixel_image/" + image_name.split('.')[0] + "superpixel.png"
    html_replace['superpixel_image_path'] = superpixel_image_url

    # pose_image_path
    pose_image_url = "pose_image/" + image_name.split('.')[0] + "pose.png"
    html_replace['pose_image_path'] = pose_image_url

    # result_image_path
    result_image_url = "result_image/" + image_name
    html_replace['result_image_path'] = result_image_url

    # 删掉复制过去的图像
    os.remove(image_dst)
    return render(request, "bikeperson.html", html_replace)
HTML模板
使用Django返回的字典来替换HTML中的变量,得到input image path。
<dev style="background:#eeeeee;height: 240px; width: 240px; float: left; text-align: center">
<img src="" height="" width="">
</dev>
例如,我之前的图像是显示在task2/1/这个url的网页上,这个时候想要再加载一个图像,这个图像的src为input_image/0001_c1_eletric0007.png,图像就会被解析到
http://127.0.0.1:8000/task2/1/input_image/0001_c1_eletric0007.png 这个URL上,然后通过urls.py中的url解析规则,映射到对应的图像上。